How to Add Two Factor Authentication in WordPress for Free
Hi to all in this article, I am going to tell you all about how to add two factor authentication in WordPress website easily in just few minutes.
You can easily improve your website security and protect it from technocrats by enabling this 2FA.
What is Two factor Authentication ?
2FA or Tw Factor Authentication is an extra layer of security over the passcode used to login into your account, you will need to verify your identity by adding OTP or One Time Password, every time you login.
You can enable this feature in your WordPress website for free and there is no need for any paid plugin for this feature.
This is like a Two Step verification that you see in your popular social media platforms like Twitter and Google etc.
Best Two factor Authentication plugins for WordPress websites are as follow:
- Wordfence
- Authy
- MiniOrange
- Google Authenticator
- Rublon Two-Factor Authentication
- iThemes Security Pro
- others....
If you use this 2FA feature then you can safeguard your website from others, so if you not added this feature till now in your WordPress website then add this now.
Read the below steps carefully and completely, if you miss any one step then you will get error while doing the process.
 |
| How to Add Two Factor Authentication in WordPress for Free |
Steps to add 2FA in WordPress for Free
Step-1: First of all you need to login to your WordPress website dashboard by using your login credentials.

Step-2: Now click on Plugin and click on Add New.
Step-3: Here you need to enter Wordfence Security in the search box and click on search.
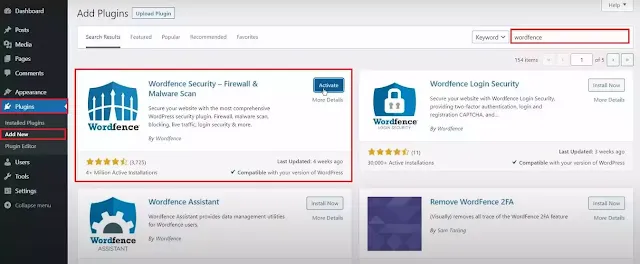
Step-4: Now click on Install Now and Activate the plugin new.
Step-5: Go to settings -> Select Wordfence -> Wordfence settings -> Click on Resume Installation.
Step-6: Here you need to enter your email address and click on terms and conditions and continue.

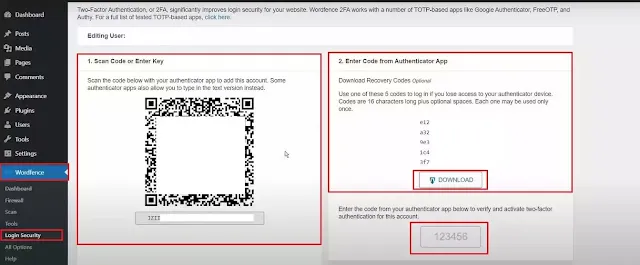
Step-7: Now you need to select login security option from the settings under wordfence.
Step-8: In this page you will see two options.
- Scan code or Enter key
- Enter code from Authentication App
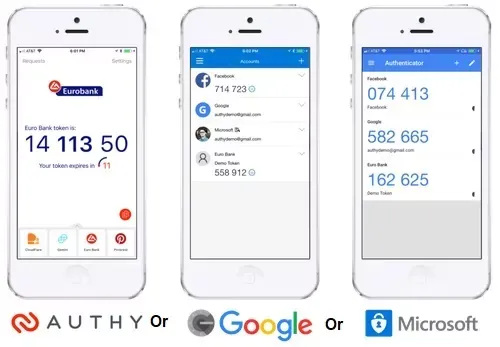
Step-9: Now you can choose any one authenticator app i.e. Google Authenticator and Microsoft Authenticator.
Step-10: Here I am telling about google authenticator, after downloading the app, you need to open it will ask your to scan, click on it and scan the QR code visible in the WordPress setting.
Before going further you need to download the recovery codes and save it in a secure place in your computer for future reference, and this recovery codes will be visible in the same page where you scanned the QR code, if you don't have any access to your authenticator app then you can use these backup recovery codes to login to your website.
Step-11: After successful scanning the code from google authenticator app, google will send authentication codes, and you need to add that authentication code in the box visible below the the recovery codes.
Step-12: After entering the authentication code click on Activate.
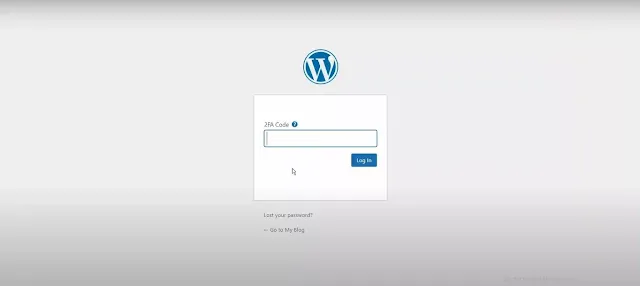
Step-13: Now two step authentication is enabled in your website.

Step-14: You can check it by logout from your dashboard and login back, here after entering your login password, it will show your to enter the two factor authentication code, there you can add the authentication code from the authenticator app and click on login.
Note:
You can use google authenticator or Microsoft authenticator, for two factor authentication and the process for authentication for both apps are same and you can watch demo videos from YouTube about the both authenticator apps.
Conclusion
I hope that you have understood about adding two factor authentication in your WordPress website easily in just few minutes and if you have any doubts about this then fell free to contact us.