How to Add Custom Cursor Effect in Blogger and WordPress Website
Hi to all in this article, I am going to tell you all about how to add custom cursor effect in blogger website easily in just few minutes.
Read the below provided steps carefully and completely, if you miss any step then you may face any error while saving your theme code.
 |
| How to Add Custom Cursor Effect in Blogger and WordPress Website |
Steps to Add Custom Cursor Effect in Blogger
Step-1: Login to your blogger dashboard by using your login credentials.
Step-2: Now click on Theme section -> Customize -> Back Up Theme -> Download Theme.

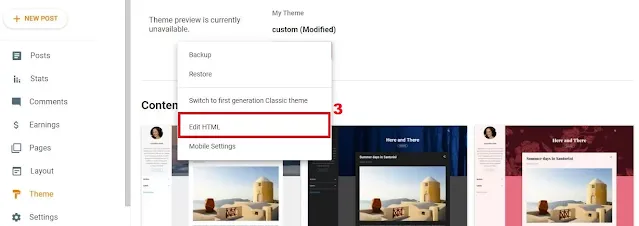
Step-3: Now gain click on Theme Section -> Arrow button -> Edit HTML.
Step-4: Now click on the blank area and press CTRL + F and enter </body> tag and press Enter.
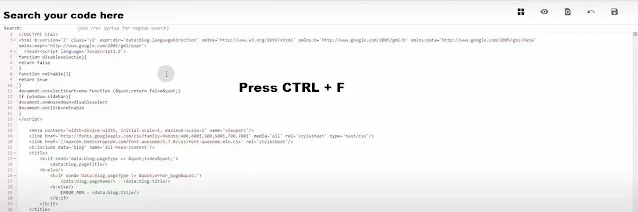
Step-5: Now copy the below given code and paste it above </body> tag or closing body tag and click on save.
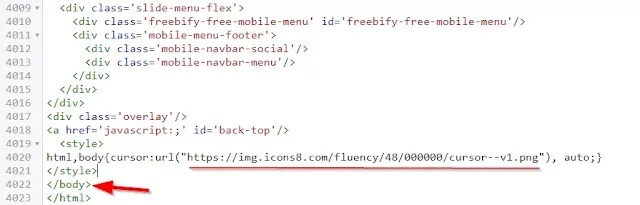
Note: If you want to change icon then you can visit this website.
Step-6: You have successfully added the custom cursor effect in your blogger website easily.
Steps to Add Custom Cursor Effect in WordPress
Step-1: Login to your WordPress dashboard by using your login credentials.
Step-2: Click on Appearance -> Customize -> Click on Additional CSS.
Step-3: Now copy the below given code.
Step-4: Paste the copied code in the Additional CSS and Publish.

Step-5: Change the icon of the custom cursor effect as per your requirement.
Step-6: Now you have successfully added the custom cursor effect in blogger.
Conclusion
I hope that you have understood to add custom cursor effect in your blogger website easily in just few minutes.