How to Add Bottom Sticky Ad Banner in Blogger | Footer Ads with Scroll Down to Hide and up to Show
Hi to all, here I am going to tell you all about how to add bottom sticky ad banner in blogger website easily in just few minutes by using HTML, CSS and JavaScript.
By adding this sticky banner, you can increase ad revenue more i.e. if your visitor scrolls the website till and up then this banner comes our and if you add your ad code in the HTML code, then ads will run and your ad impressions will increase and also clicking rate will increase and then ads revenue increases.
Even if your visitor don't want to see the banner then, they can click on close icon to remove the banner from the webpage easily.
Sticky ads are a banner ad format that hovers or hovers on the screen and sticks or sticks to the edges of the screen on a site that is separate from the content and can be closed easily.
The below provided codes will not effect page speed, so you can use the codes in any blogger templates and also this banner is responsive.

Read the below provided steps carefully and completely to get clear understanding about how to add bottom sticky ad banner, if you miss any one step then you may get error while saving the code in theme editor.
Steps to Add Bottom Sticky Ads in Blogger
Step-1: First of all you all need to login to your blogger website dashboard by using your website login credentials.

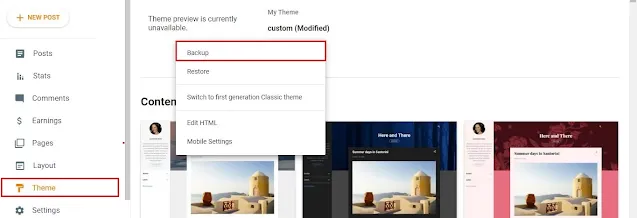
Step-2: Go to blogger website dashboard -> Click on theme section -> Click on arrow icon -> Select backup -> Click on download theme.
Step-3: Go to blogger website dashboard -> Click on theme section -> Click on arrow icon -> Select Edit HTML -> Blogger theme editor.

Step-4: Copy below provided HTML code and paste the copied HTML code above closing body tag or </body> tag.
Step-5: Now Copy below given JavaScript Code and paste the copied JavaScript code above closing body tag or </body> tag.
Step-6: Now again copy the below provided CSS code and paste the copied CSS code above closing head tag or </head> tag.
Step-7: After adding the three codes, click on save button.
Step-8: Now you have successfully added bottom sticky banner in your blogger website easily in just few minutes without any error.
Note
If you get any error while saving the code then you need to restore the backup code again and need to repeat the same process as mentioned in the above steps carefully.
If you want to change the style of the banner then you need to modify CSS code and to change the colors you need to replace color codes and for color codes you can use google color picker or any other third part website.
Conclusion
I hope that you have understood about how to add bottom sticky ads banner in blogger website easily in just few minutes by using HTML, CSS and JavaScript.