How to Add Shaking Hover Effect on Blogger Images
Hi to all, here I am going to tell you all about how to add shaking effect on blogger images easily in just few seconds by using CSS.
By adding the code it provides a good look to your blogger post image sand also it will attract your visitors attention towards your blogger images and gives a professional look to your blogger website.
You can use the CSS code in any blogger templates and also in other websites like WordPress etc..
Read the below provided steps carefully and completely to get clear understanding about how to add shaking hover effect in images, if you miss any one step then you will definitely get error while saving the code in blogger theme editor, so read the article till end.

Steps to Add Shaking Hover Effect on Blogger Images
Step-1: First of all you need to login to your blogger website dashboard by using your login credentials.

Step-2: Go to blogger website dashboard -> Click on theme section -> Click on arrow icon -> Choose backup -> Click on download theme.

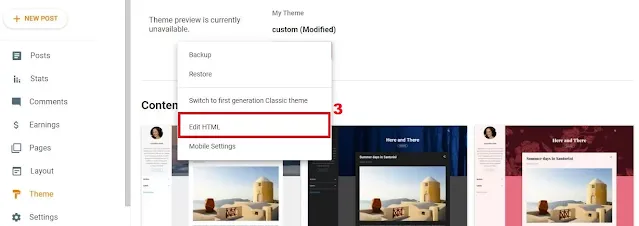
Step-3: Now go to blogger website dashboard -> Click on theme section -> Click on arrow icon -> Choose Edit HTML -> Blogger theme editor.
Step-4: Copy the below provided CSS code.
Step-5: Now paste the copied CSS code above ]]></b:skin> tag.
Step-6: After adding the code in theme editor, click on save button.
Step-7: It will take few seconds for processing the theme code and after successful processing you will see a message i.e. Updated Successfully.
Step-8: Now you have successfully added shaking hover effect on your blogger website easily in just few seconds.
Note
If you get any issue or error while saving the theme code, then you need to restore your backup code again and need to repeat the same process as provided in above steps carefully.
If you want to modify any style then you need to change CSS code as give above carefully.
Conclusion
I hope that you have understood about how to add shaking effect on blogger images easily in just few minutes by using CSS.