How to Add Navigational Buttons in Blogger Website
Hi to all, in this article, I am going to tell you all about how to add previous and next navigational buttons in your blogger website easily in just few minutes.
Basically by using this you can improve your website user experience and also you can reduce your website bounce rate.
This buttons will help your website user or visitor to find your articles easily and they can find new articles easily by just clicking on the buttons.

If you wan to add previous and next navigational button, then you can in correct place, I have provided few steps below, read them and apply to your blogger website without any error or issue.
How to create Bing Web Master Tool Account - Click Here
Steps to Add Previous & Next Navigational Buttons
Step-1: First of all, you need to login to your blogger website dashboard by using your login credentials.

Step-2: Follow the below provided path:
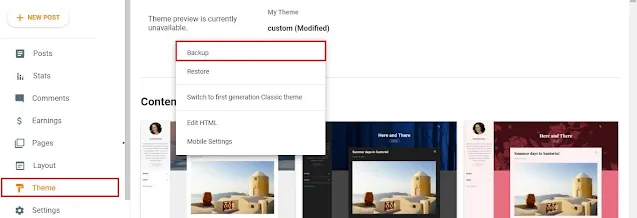
Blogger website dashboard -> Theme section -> Arrow icon -> Backup -> Download theme.
Step-3: Now again follow the below provided path:
Blogger website dashboard -> Theme section -> Arrow icon -> Edit HTML -> Blogger theme editor section.

Step-4: First of all copy the below provided HTML code and paste the copied HTML code just below <data:post.body/>.
<b:if cond='data:blog.pageType == "item" '>
<div class='K2_Pre_Next'>
<b:if cond='data:olderPageUrl'>
<a class='pre-btn' expr:href='data:olderPageUrl'>
<div class='icon'><svg class='h-6 w-6' fill='none' stroke='currentColor' stroke-width='2' viewBox='0 0 24 24' xmlns='http://www.w3.org/2000/svg'><path d='M11 19l-7-7 7-7m8 14l-7-7 7-7' stroke-linecap='round' stroke-linejoin='round'/></svg></div><div class='label'>Previous</div></a>
</b:if>

<b:if cond='data:newerPageUrl'>
 <a class='next-btn' expr:href='data:newerPageUrl'>
 <div class='label'>Next</div>
 <div class='icon'><svg class='h-6 w-6' fill='none' stroke='currentColor' stroke-width='2' viewBox='0 0 24 24' xmlns='http://www.w3.org/2000/svg'><path d='M13 5l7 7-7 7M5 5l7 7-7 7' stroke-linecap='round' stroke-linejoin='round'/></svg></div></a>
</b:if>
</div>
</b:if>
Step-5: Now copy below provided CSS code and paste the copied CSS code above ]]></b:skin> tag.
 /* CSS code for previous-Next button */
.K2_Pre_Next .icon {width: 20px;height: 20px;}
.K2_Pre_Next {display: flex;position: relative;margin-top: 24px;}
.K2_Pre_Next .pre-btn,.K2_Pre_Next .next-btn {display: flex;align-items: center;justify-content: center; gap: 8px;font-family: "Inter", sans-serif;background: #ff1a75; color: #fff;text-decoration: none;padding: 8px 24px;font-size: 16px;min-width: 150px;box-shadow: rgba(0, 0, 0, 0.15) 1.95px 1.95px 2.6px;width: 50%;border-left:1px solid; border-right:1px solid;}
.K2_Pre_Next .pre-btn:hover,.K2_Pre_Next .next-btn:hover{background: #3a8f7b;}
.K2_Pre_Next .next-btn {position: absolute;right: 0;}
.K2_Pre_Next .pre-btn:hover .icon {animation: nav-prev-anim 300ms alternate infinite;}
.K2_Pre_Next .next-btn:hover .icon {animation: nav-next-anim 300ms alternate infinite;}
@keyframes nav-prev-anim { to {transform: translateX(4px);}}
@keyframes nav-next-anim {to {transform: translateX(-4px);}}
Step-6: Paste the code in correct place carefully, if you paste the code in wrong place then code won't work properly.
Step-7: After pasting the two codes then, Click on Save button.
Step-8: Now you have successfully added the next and previous navigational buttons in your blogger website easily in just few minutes.
Note:
If you get any error while saving the code, then you need to restore your backup code again and need to follow the same process as given in above steps carefully.
If you want to change the colors of the buttons, then you need to replace the color codes and for color codes you can use google color picker.
Conclusion
I hope that you have understood about how to add previous and next navigational buttons in your blogger website easily in just few minutes by using HTML and CSS.